
Keep Urine Warm for Tests: Complete Temperature Guide
So you’re sweating about a drug test.
And you’ve probably asked the wrong question already.
“How long does pee stay warm in a pill bottle?” It’s the classic, frantic Google search. And it leads people straight to failure.
Here’s the brutal truth.
Labs don’t mess around. They check the temperature of your sample within 4 minutes of you handing it over. That’s the rule.
The acceptable range? 94°F to 100°F.
That’s it. A tiny window.
Fall outside that range… and you’re done. Automatic fail. Doesn’t matter if your sample is cleaner than mountain spring water. The test is invalid. All that stress, all that prep—wasted on a technicality.
Why so strict? Because fresh pee comes out of your body at around 98.6°F. It cools fast.
- All you need to pass your test in one kit.
- It will pass specimen validity tests.
- Labs cannot tell that it’s synthetic.
- Invisible under clothes.
- Maintains perfect temperature.
- All you need to pass your test in one kit.
- It will pass specimen validity tests.
- Labs cannot tell that it’s synthetic.
- Invisible under clothes.
- Maintains perfect temperature.
So “how long does urine stay warm?” is the real question. And the answer is: not long at all.
That pill bottle in your pocket? It’s losing heat every second. Body heat alone won’t cut it. Even stashing it “between your legs” like some Reddit threads suggest is a fiddly, risky game. You’re fighting physics.
And a plastic bottle? It cools even faster than you’d think.
The lab knows this. An out-of-range temperature is their first red flag. It screams “tampered.” Below 94°F? They think it’s old or substituted. Above 100°F? They think you nuked it in a microwave.
Either way… you’re slammed.
This guide is your troubleshooting manual. We’re going to diagnose the exact mistakes that cause temperature failure. So you can stop guessing and start fixing.
Symptom: Your Urine Sample Is Outside the 94–100°F Range
So you check the strip.
The color’s wrong.
It’s outside the 94–100°F range.
That’s it.
Game over.
This is the symptom. The immediate, physical proof that something went sideways. And in the eyes of the test collector, it’s the first and biggest red flag.
Here’s the deal. The second you hand over that cup, the clock starts. They have four minutes, max, to check the temperature strip stuck to the side. No waiting. No “let me get to it.” It’s an instant, on-the-spot judgment.
And the rule is simple.
What temperature should urine be for a drug test? Between 94 and 100 degrees Fahrenheit. That’s the only acceptable window.
If your sample lands outside that box, the collector marks a big, fat “NO” on the form. It’s not a maybe. It’s not a “let’s see what the lab says.” It’s an automatic, non-negotiable fail at the collection site.
Why so harsh?
Because to them, an out-of-range temp doesn’t look like an accident. It looks like evidence.
Below 94°F? They assume it’s old, stored, or you used someone else’s clean sample that cooled down.
Above 100°F? They assume you artificially heated it to fake freshness.
Either way, the conclusion is the same: tampering.
And the consequences are brutal. It can be treated exactly like a refusal to test. For a job, that’s an instant disqualification. For probation, that’s a direct violation. You don’t get to explain. The failed drug test because of urine temperature is written up before you even leave the room.
This is the most preventable failure there is. But people get slammed by it every day because they don’t respect the physics or the full requirements of how to pass a urine test. They think body heat is enough. They think a quick zap in the microwave is fine. They’re wrong.
The lab knows what normal urine temperature for males vs females naturally is—right around core body temp, 98.6°F. It cools predictably. Any deviation from that natural cooling curve is a giant, flashing warning sign.
So you’re sitting there, staring at that wrong-colored strip. The collector is already writing “NO.” Your stomach drops.
But why does this happen?
Even when you try to keep it close to your body?
That’s the real question. And the answer is where we’re headed next.
Root Cause: How Quickly Urine Cools and Why Body Heat Isn’t Enough
Here’s the thing.
Your body is a furnace. It runs at a steady 98.6°F.
But the second that liquid leaves you, it starts dying.
The clock is ticking.
Labs give you a four-minute window. They check the temp strip on the cup almost immediately.
And in those few minutes, your sample is in a freefall.
Think about it.
You’ve got a tiny volume of liquid. Maybe two ounces.
It’s in a thin plastic cup. Plastic is a terrible insulator.
The air around it—especially in a chilly clinic bathroom—is way colder than your body.
So what happens?
Heat escapes. Fast.
Your core temp is 98.6°F. Your skin’s surface? Cooler. Maybe 90-95°F in a warm spot like your groin.
The sample, pressed against that skin, is already starting lower than you think.
Then the real cooling kicks in.
Without an active heat source, that sample is racing toward room temperature.
Body heat alone? It’s a slow leak, not a plug.
It might buy you 30 minutes in a best-case scenario—pressed tight in your inner thigh, small volume, warm room.
But in a cool waiting room with nervous sweat on your skin? That time gets slammed.
The common lies we tell ourselves:
- “My body heat will keep it warm.” It won’t. It just slows the crash.
- “This pill bottle is fine.” It’s not. It’s thin, and it conducts heat away.
- “I’ll just hold it in my hand.” Your hand is often the coldest part of you. Worst spot.
This mismatch—between the fantasy of “body heat” and the physics of heat loss—is why people fail.
The sample drops below 90°F.
The collector sees a cold cup. Game over.
What about synthetic urine?
The same rules apply.
What temp does synthetic urine need to be?
The same 90-100°F range. It’s designed to mimic the real thing.
How long does synthetic urine stay warm for?
Without a heat source, not long. Same 30-60 minute decay curve, depending on the container and environment.
And the big question: can you reheat synthetic urine?
Here’s the juicy part.
Most quality synthetics are built for one heat cycle. You warm it to the target temp for the test.
Can synthetic urine be reheated multiple times?
Generally, no. Repeated heating and cooling can degrade the formula, mess with the pH, or create inconsistencies a lab might flag.
Think of it like a delicate sauce. You can bring it to temp once. Do it again, and it might break.
So the root cause isn’t bad luck.
It’s bad physics.
You’re fighting a losing battle against thermodynamics with the wrong tools.
Knowing that is half the fight. The other half is finding a method that actually adds heat back in.
Mistake: Relying on a Pill Bottle and Body Heat Alone
Let’s get into the first big mistake.
The pill bottle tuck.
You know the one. You grab an old prescription bottle, fill it with your clean sample, and shove it… somewhere.
Your waistband. Your bra. Between your thighs.
The logic seems solid. Your body is warm. It’ll keep the bottle warm.
Simples, right?
Nope. This is where so many people get slammed.
Here’s the typical failure scenario. You do everything right at home. You warm the sample perfectly. You tuck it away, feeling confident.
But then… the drive to the clinic. The waiting room. The fiddly part of actually getting into the bathroom.
That’s when physics kicks in.
Your body heat isn’t a heating pad. It’s a fading ember.
Skin contact is inconsistent. Maybe the bottle shifts. Maybe your body runs cold from stress—those atrocious cold sweats are real.
Ambient temperature matters too. A chilly waiting room is a sample killer.
The data is clear. Relying solely on body heat, you’re fighting a losing battle. That sample starts losing degrees the second you stop actively warming it.
After just 4 minutes in a cool environment, the temp can plummet. And guess what? The collector has to check that strip within 4 minutes of you handing it over.
That’s the federal guideline.
So your perfect 98°F sample? By the time it’s in the cup, it could easily be 91°F.
Too cold.
And a cold sample is an immediate red flag. It looks stale. It looks substituted. It gets you an automatic fail or a retest you can’t afford.
The whole point was hiding it. But all you’ve done is hide a failure on your body.
Knowing this method sucks is key. But here’s the thing… just knowing isn’t enough.
Because the next logical step people take to fix it—grabbing a hand warmer—introduces a whole new set of mistakes. And they’re even easier to screw up.
Mistake: Misusing Hand Warmers, Heat Pads, or Activator Powder
So you’re thinking… “Fine. I’ll just use a hand warmer.”
Simples.
But this is where things get really fiddly. And the margin for error is brutal.
Grabbing a random hand warmer from your glove box is a classic screw-up. These things are designed to keep fingers toasty, not to gently warm a vial of liquid to a precise 90–100°F. They get hot. Often way hotter than 100°F.
Here’s the first big mistake: Slapping one directly onto your bottle without a constant temp check.
You’re not just warming it. You’re cooking it. That hand warmer can push your sample past 100°F in minutes. The second it hits 101°F… you’re done. The temperature strip (if you’re even using one) goes black. The lab tech sees a sample that’s artificially hot. That’s an instant flag for tampering.
Overheating is a silent killer. It doesn’t just look suspicious. It actually breaks down the chemicals in urine, like urea. The composition changes. It stops looking like real, fresh human piss. And that’s a fail you can’t talk your way out of.
The panic is real. Imagine you’re in the parking lot, you check the strip, and it’s solid black. It’s too hot. You’ve got 15 minutes until your appointment. What do you do? Blow on it? Wave it around? There’s no good fix. You’re screwed before you even walk in.
The second mistake is even more common: creating hot spots.
If you tape that chemical warmer right against the plastic, one spot on the bottle gets scorching hot while the rest is cooler. You get an uneven, unnatural heat. The temperature strip might read a safe 96°F, but the liquid touching the heater could be 105°F. When you shake it or pour it, you mix that hot spot in… and suddenly the whole sample is too warm.
The fix? You’re supposed to avoid direct contact. Wrap the warmer in a sock or a piece of cloth first. Create a buffer. But that’s more gear, more bulk, more fiddly prep work in a stressful moment. It’s easy to forget or do wrong.
And then there’s the activator powder.
Some DIY guides talk about using chemical powders that heat up when they react with water. Sounds gangster, right? A quick, discreet heat source.
But here’s the juicy secret: Labs are wise to this. These powders can leave trace chemical signatures. They can alter the pH or specific gravity of the sample in ways that don’t match natural urine. It’s like adding a foreign ingredient that screams “I was altered in the last 30 minutes.”
You’re trying to solve a temperature problem, but you’re creating a chemistry problem. And modern labs test for chemistry first.
So you’ve gone from a simple “keep it warm” task to a high-stakes game of thermal engineering and chemical stealth. One misstep with a hand warmer or a packet of powder, and you don’t just fail… you fail in a way that looks intentionally fraudulent.
It’s a lot of pressure to get perfect. And most people don’t.
Mistake: Overlooking Temperature Strips, Leaks, and Waiting Room Delays
So you’ve got the heating method dialed in.
But that’s only half the battle.
Because there are three sneaky failure points that can still slam you. And they’ve got nothing to do with how you warmed the bottle.
1. The Faulty Temperature Strip
This is your only real-time gauge. And it can lie to you.
Most strips use heat-sensitive liquid crystals. They change color to show the temp. Sounds simple.
But they can be fiddly. The adhesive can wear off. The colors can be hard to read in bad lighting. Or worse—the strip on your urine bottle with temperature strip just stops working.
You’re staring at it, trying to remember how to read a synthetic urine temperature strip. Is that blob green? Is it tan? The difference between 96°F and 92°F is the difference between pass and fail.
And if you’re scrambling last minute, searching for “temperature strips for urine near me” is a panic move you don’t want to make.
A faulty strip gives you false confidence. You think you’re in the zone. You’re not.
2. The Leak or The Noise
You’ve hidden the bottle. Good.
But did you test the seal? Did you listen for sloshing?
A tiny leak in your waistband isn’t just messy. It’s a dead giveaway. And in a quiet clinic bathroom? The click of a plastic cap or the glug of liquid pouring can sound like a fire alarm.
That sound is your anxiety multiplied. It’s the kind of detail that gets overlooked until you’re in the moment. And then it’s too late.
3. The Killer: Waiting Room Delays
This is the big one. The silent killer of perfect plans.
The rule is clear. The temperature must be checked within 4 minutes of you handing over the cup.
But what if they make you wait?
What if the waiting room is freezing? What if your name isn’t called for 30 minutes? That carefully warmed sample is now sitting in an air-conditioned room, dropping degree by degree.
Your body heat alone can’t fight that. The warmth you banked starts draining away. And you’re just sitting there, watching the clock, feeling your chances plummet.
That 4-minute window isn’t a suggestion. It’s a hard lab rule. And unpredictable delays are designed to expose samples that aren’t fresh.
So you’ve diagnosed the symptom, understood the root cause, and seen the three big mistakes.
Now what?
Pre-Test Temperature Audit: A Checklist Before You Go In
Right. So you know the stakes. You’ve seen the mistakes.
Now it’s time for the final check. The pre-flight audit.
This is your Definition of Done. Run through this list before you leave. No exceptions.
The 7-Point Pre-Test Audit
1. The Dry Run is DONE.
You practiced the full sequence. Retrieve the bottle. Check the temp strip. Shake it. Pour it into a cup (use water!). Re-conceal it. You can do it all in under 90 seconds. No fumbling. No panic.
2. The Temp Strip is a GO.
You can read that strip in 2-3 seconds flat. You know exactly where the green/tan dot needs to be. You’re not holding it up to the light or squinting. A quick glance tells you everything.
3. You Passed the Movement Test.
You concealed your setup with warm water inside and moved around for 15-20 minutes. You walked. You sat down. You climbed some stairs. No sloshing sounds. No bottle shifting into an uncomfortable position. No visible bulges when you check the mirror from every angle.
4. Concealment is Invisible.
Your chosen method—stash underwear, leg belt, whatever—creates zero outline. Not from the front. Not from the side. Not when you sit down. It’s just… part of you.
5. Body Heat is Maximized.
The bottle is positioned directly against your skin. Inner thigh or groin. No thick fabric separating it from your body. Your natural heat is its first and best friend.
6. The Heat Pad is ACTIVE & INSULATED.
The heat pad is attached and doing its job. Crucially, it’s pressed against your body, not exposed to open air. This insulates it, making it last longer and work more consistently. Remember: once it’s activated, you can’t restart it.
7. You Have a Backup Plan.
You have a secondary heat source ready. A small vial of heat activator powder tucked away safely. This is your insurance policy for an unexpected, lengthy wait. (Pro tip: Don’t pre-add it “just in case.” Combined heat sources can overshoot the temp.)
Simples.
You’ve just turned a mountain of anxiety into a 7-point checklist. Each box you tick is a failure point you’ve eliminated.
So you’re not just hoping for the best. You’ve engineered it.
- All you need to pass your test in one kit.
- It will pass specimen validity tests.
- Labs cannot tell that it’s synthetic.
- Invisible under clothes.
- Maintains perfect temperature.
- All you need to pass your test in one kit.
- It will pass specimen validity tests.
- Labs cannot tell that it’s synthetic.
- Invisible under clothes.
- Maintains perfect temperature.
Troubleshooting Table: Quick Fixes for Temperature Problems
So you’ve done your prep.
You’ve ticked every box on that 7-point audit.
But what if something still goes wrong in the moment?
Don’t panic.
Here’s your quick-reference cheat sheet. Find your symptom. Apply the fix.
Troubleshooting Table: Quick Fixes for Temperature Problems
| Symptom / Problem | Immediate Fix & Next Step |
|---|---|
| Sample below 94°F | The sample is too cold. It’ll get flagged. Secure it against your body heat immediately. The groin or inner thigh is best. Hold it there for 3-5 minutes. Re-check the temp strip right before you pour. |
| Sample above 100°F | It’s too hot. This looks fake and can break down the urine. Let it cool down. Hold the bottle away from your body. Wave it gently in the air. Re-check the temp strip every 60 seconds until it’s in the 94–100°F zone. |
| Temperature strip unreadable | The strip is broken or the color won’t show. You need a backup reading. If you have a separate digital thermometer, use it. If not, your only move is to trust your heat source timing and submit. The strip failing is rare, but it’s why your prep matters. |
| Bottle leaking | Contain it. Now. If it’s a small leak, wipe it dry and reposition it against your skin to seal it with body heat and pressure. If it’s a major leak, you need a backup plan. This is why having a second, sealed container as a contingency is a culmination move. |
| Long wait time announced | Your heat source is now on the clock. Keep the sample insulated against your skin. Your body is the best, most consistent heater. Do not keep checking it and letting heat escape. Wait. Then re-check the temp strip the second before you stand up to go in. |
The bottom line?
Most failures aren’t because the plan was bad.
They’re because there was no plan for when the plan hits a snag.
This table is that plan.
So you’re not just hoping for the best.
You’re ready for the worst.
Step-by-Step Guide: Keeping Urine Warm Without Specialized Products
Alright. Let’s get into the nitty-gritty.
This is the manual, DIY protocol.
It’s the best-case scenario for keeping your sample warm without buying a kit.
But here’s the brutal truth: this method is fiddly. It’s a house of cards. One wrong move, one delay, and the whole thing collapses.
So follow this to the letter.
Step 1: The Prep (Don’t Skip This)
First, you need the right container.
A small, clean, leak-proof bottle with a built-in temperature strip is non-negotiable.
No strip? You’re flying blind. Game over before you start.
Verify the strip works. Test it with warm water. Does the green line move? Good.
If you’re using powdered fake pee, mix it now with room-temperature water. Follow the instructions on the packet to the milliliter.
Step 2: The Initial Heat (The Microwave Gamble)
This is where most people screw up.
For premixed liquid synthetic urine:
- Uncap the bottle. Metal in a microwave is a bad time.
- Microwave for no more than 10 seconds.
- Check the strip immediately. You’re aiming for the high end of the green—around 100°F.
- Still too cool? Do short bursts of 3-5 seconds. Check after every single burst.
WARNING: Overheating is a silent killer. It can degrade the urea and creatinine in the sample. Lab sees that? You fail. Uneven heating creates hot spots that make your strip reading a lie.
Step 3: Securing for Transport (Your Body is the Heater)
Now you have to keep it at temp. Your body heat is your only tool.
Optimal placement is everything:
- Between the thighs or groin. This is prime real estate. It’s close to your core.
- Tight against the inner thigh.
- Snug in your underwear, right against the skin.
- Under the armpit or in a bra (if applicable).
Secure it so it doesn’t move. Use a snug holster, a strap, or tight compression shorts. “Whitey-tighties” are actually gangster for this—they hold everything close.
Insulate it. Wrap the bottle in a sock or thin cloth. This helps trap the heat your body is putting out.
The Catch: Body heat alone rarely cuts it. Without a supplemental heat source, your sample can drop below 90°F in under 30 minutes. It’s a slow leak you can’t stop.
Step 4: The Final, Critical Check
This is the moment of truth.
Re-check the temperature strip the SECOND before you walk into the testing room.
Not five minutes before. Not when you’re in the car. Right before you go in.
Why? Because urine temp drops 1-2°F per minute in open air.
Federal guidelines are clear: the sample must be in the 90-100°F range within four minutes of you handing it over.
That strip reading is your last line of defense.
The Bottom Line
This method can work.
But its success hangs on a thread. It demands perfect execution, zero delays at the clinic, and no surprises.
Practice this at home first. Simulate the drive, the wait, the whole timeline. See if your temp holds.
Avoid direct sunlight or blasting the car heater—those can overshoot your temp unpredictably.
Simples, right?
Except it’s not. It’s a high-wire act where one stumble—a longer-than-expected wait, a faulty strip, a nervous fumble—means you fall.
And that’s the limit of the home hack. It’s fragile.
- All you need to pass your test in one kit.
- It will pass specimen validity tests.
- Labs cannot tell that it’s synthetic.
- Invisible under clothes.
- Maintains perfect temperature.
- All you need to pass your test in one kit.
- It will pass specimen validity tests.
- Labs cannot tell that it’s synthetic.
- Invisible under clothes.
- Maintains perfect temperature.
When DIY Methods Fail: The Limits of Home Hacks
But here’s the thing.
That high-wire act? It’s fragile.
And for a high-stakes test, fragile is the last thing you need. The DIY guide is the best you can do with stuff from your kitchen. But it has critical failure points.
Let’s break them down.
It requires microwave access.
Which is a huge problem for random tests. You can’t exactly ask your supervisor for 10 seconds with the break room nuker. And microwaving too long or with the cap on risks pressure buildup. That can wreck the bottle or degrade the sample chemistry. Not gangster.
It’s a sitting duck for wait times.
You have a four-minute window. That’s it. If the clinic is slammed and you’re waiting longer, your sample cools below 90°F. Game over. Air-conditioned rooms accelerate this. Your carefully warmed bottle becomes a cold, obvious fake.
It offers zero discretion for supervised tests.
Fidgeting, adjusting your clothes, avoiding eye contact—trained staff spot this stuff a mile away. If they see a suspicious lump or you’re acting weird, they can demand a directly observed recollection. Your hidden bottle is now a liability.
And it completely lacks a lab-verified formula.
This is the big one. Modern labs don’t just check temperature. They run Specimen Validity Testing (SVT). They’re looking for creatinine, specific gravity, pH, and natural biomarkers like caffeine or urobilin.
Your DIY mix? It fails these checks.
- Creatinine too low? Flagged as diluted.
- Specific gravity off? Flagged as substituted.
- pH outside 4.5–8.0? Flagged.
- No natural foam when shaken? Trained techs notice.
- Wrong smell? Flagged.
Worse, advanced GC-MS testing can detect the absence of 1,000+ natural metabolites found in real human urine. Your homebrew doesn’t stand a chance.
How Labs Detect Fakes: Why Temperature Is Only the First Check
But passing the temperature check is just the first hurdle.
The real question is: what happens next?
So, let’s break down the lab’s playbook. It’s a two-stage process, and understanding it is the key to not sweating bullets.
Stage 1 is the mandatory filter.
This is called Specimen Validity Testing, or SVT. Every single sample, for every single test, goes through this first. It’s not optional.
Think of it as the “sniff test.” The lab isn’t looking for drugs yet. They’re checking if the liquid in the cup is even plausible as human urine.
They’re running your sample against a strict checklist:
- Temperature: (You already know this one—90°F to 100°F).
- pH: It has to be in the normal acidic range. Too high or too low screams “adulterated.”
- Creatinine: This is a waste product in urine. If it’s virtually zero, the sample is flagged as “substituted.”
- Specific Gravity: This measures concentration. Pure water would fail this.
Fail any of these, and you’re done. The test is reported as invalid or refused before they even look for THC.
Stage 2 is the deep dive.
This is where it gets spicy. If your sample passes SVT, it might get a closer look. This isn’t always done, but modern labs have the tools.
They can screen for biocides—preservatives common in cheap, old-school synthetic urine. They can check for unnatural markers or a complete lack of compounds like urea and uric acid that real urine always has.
This is the “can fake pee be detected” fear, realized. The answer is yes—if the formula is garbage.
So, how do you beat both stages?
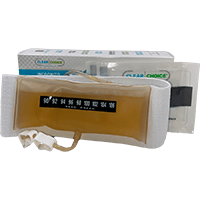
You use a kit that was engineered for this exact two-stage gauntlet. This is where a product like Quick Luck stops being just a bottle of warm liquid and becomes a piece of lab-tested equipment.
It’s formulated to clear every SVT checkpoint. The heat activator powder and pads nail the temperature. Its pH and creatinine levels are balanced to human norms. Its specific gravity is calibrated with electrolytes.
But more importantly, it’s designed for Stage 2. It contains urea, uric acid, and mineral salts—the actual chemical signature of real piss. It’s not just avoiding biocides; it’s actively mimicking the complex profile of a clean, human sample.
The science is clear. Cheap fakes get slammed by basic validity checks. A premium formula is built to pass them.
It’s the difference between bringing a toy gun to a shootout and showing up with body armor. One is a hope. The other is a plan based on intel.
Real-World Tips: Reducing Anxiety and Avoiding Suspicion During the Test
So you’ve got the formula dialed.
The temperature is perfect.
But here’s the thing.
All that prep can get obliterated by shaky hands and a racing heart.
The number one reason people fail isn’t detection.
It’s user error from stress.
Your job is to be a ghost.
Calm. Quiet. In and out.
Practice Until It’s Boring
This is the most gangster tip I can give you.
Do not use your real synthetic urine for this.
Use tap water.
Simples.
You need to build muscle memory.
The motions have to be automatic.
Practice Session 1: The Bathroom Simulation.
Wear the exact clothes you’ll test in.
Conceal the bottle.
Go into your bathroom.
Turn on the faucet for background noise.
Now… time yourself.
Retrieve the bottle.
Check the temp strip.
Gently shake it for foam.
Open the cap (quietly!).
Pour it into a cup.
Re-conceal everything.
Aim for under 90 seconds.
The lab gives you 2-4 minutes max.
Don’t be the person who gets a knock on the door.
Practice Session 2: The Waiting Room Drill.
Sit in a chair for 20 minutes with it concealed.
Cross your legs.
This does two things.
It hides any bulge.
And it keeps the sample pressed against your body heat.
Notice if it shifts.
Notice if you fidget.
Fix it now.
Dress for the Job
Your clothing is your concealment system.
Think function over fashion.
Tight boxer briefs are your best friend.
They hold everything flat against your inner thigh or lower abdomen.
Wear an undershirt tucked in.
Then your regular shirt over it.
This creates a natural pocket and hides any outline.
Avoid baggy clothes that swish.
Avoid tight pants that show a bottle shape.
Master the “Eye Test”
The collector isn’t just handing you a cup.
They’re watching.
Your sample needs to pass a quick visual.
It should look like pee.
It should smell faintly like pee (premium kits handle this).
And it should foam like pee when you pour it.
Here’s the trick.
Right before you pour… give the bottle a gentle, quick shake.
This creates a thin layer of froth on top.
It’s a tiny detail.
But it’s the difference between “looks normal” and “looks suspicious.”
Kill the Suspicious Noises
The quiet in that bathroom is deafening.
Every sound you make is amplified.
Practice opening your bottle’s cap in a silent room.
Learn how it clicks.
Then… in the real test, do it when the sink faucet is running.
Or right as you flush the toilet.
That ambient noise covers the sound.
It’s a simple hack that saves your nerves.
Control the Waiting Room
Your anxiety peaks here.
Don’t let it show.
Sit down.
Cross your legs.
Breathe normally.
Don’t make excessive eye contact with the collector.
But don’t avoid it completely either.
Just act like you’re waiting for a dentist appointment.
Bored. Slightly impatient. Normal.
If you’re facing something like passing a drug test on probation, the pressure is even higher. The monitoring is stricter. Your behavior is under a microscope. This practice isn’t just helpful… it’s essential for your freedom.
Remember.
The collector is looking for nervousness, fidgeting, and sweating.
If you look like you’ve done this a hundred times… you disappear into the background.
You’ve got this.
The formula is solid.
Now make sure your performance is solid too.
Passing with Confidence: Choosing the Right Solution for Your Test
So. You’ve made it this far.
You know the symptom. You understand the physics of why your sample cools down. You’ve seen the common mistakes that trip everyone up. And you’ve got a solid DIY protocol in your back pocket.
That’s a gangster position to be in.
But let’s be real for a second. That manual method? It’s fiddly. It requires focus, timing, and a bit of luck with the waiting room gods. One small slip and you’re back to square one.
For a lot of people, that’s just too much pressure.
What if there was a way to take all that knowledge… all those potential failure points… and just… hand them off? To a system that’s already solved the temperature puzzle for you?
That’s what the best commercial kits are. Engineered answers.
- All you need to pass your test in one kit.
- It will pass specimen validity tests.
- Labs cannot tell that it’s synthetic.
- Invisible under clothes.
- Maintains perfect temperature.
- All you need to pass your test in one kit.
- It will pass specimen validity tests.
- Labs cannot tell that it’s synthetic.
- Invisible under clothes.
- Maintains perfect temperature.
The choice comes down to you.
Do you want to master the DIY protocol? It’s possible. It takes practice and nerves of steel.
Or do you want to invest in a tool that’s built from the ground up to eliminate the guesswork? A system that handles the chemistry and the temperature so you can focus on just acting normal.
You now have the knowledge to make that choice. You understand the problem. You know the solutions.
Whether you perfect the home hack or go with a reliable kit, you’re not walking in blind. You’re walking in prepared.
And that’s how you pass with confidence. Good luck. You’ve got this.