
Test Clear Synthetic Urine: Complete Guide & Analysis
You’re staring down a drug test that could cost you a job or worse.
And it feels completely unfair.
Because how long THC stays in your system feels like forever, while other stuff clears out in days. It’s a rigged game.
So you’re looking at Test Clear Powdered Urine.
But here’s the raw truth most won’t tell you.
Most failures aren’t because the product is garbage. They’re because of avoidable, human errors made in the panic of the moment.
The sample gets too hot. Or too cold. Or you get sloppy in the bathroom. Or you pick a kit that’s already outdated for modern labs.
One tiny slip-up and you don’t just fail.
You get flagged for tampering. Which is a whole different level of trouble.
This guide is your map through that minefield. We’re not selling you a fantasy. We’re giving you the gangster-level playbook to avoid the stupid, costly mistakes that trip everyone else up.
Because the first mistake? It happens before the test is even scheduled.
It’s not understanding what’s actually in the kit you’re betting your future on.
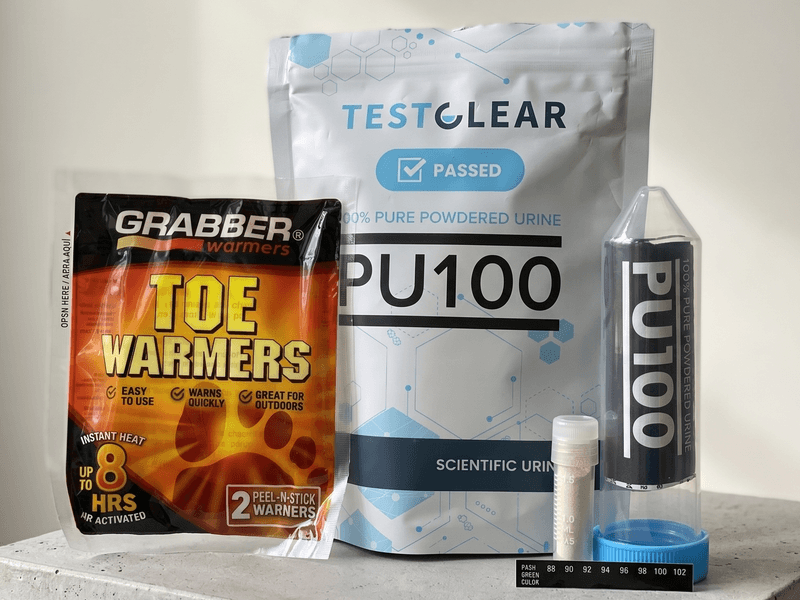
Understanding Your Test Clear Kit: Why Every Component Matters
The first mistake is thinking this is just a bottle of powder.
It’s not.
The Test Clear powdered urine kit is a system. A tiny, high-stakes puzzle where every piece has a job. Miss one, or use it wrong, and the whole thing falls apart.
Let’s break down your toolkit.
The Powdered Urine Vial.
This is the core. It’s not synthetic. It’s real human urine, dehydrated. That’s the gangster part. It contains urea, uric acid, creatinine—the exact stuff labs check for to see if urine is “valid.” This isn’t some chemical cocktail that might get flagged. It’s the real deal, just in powder form.
The 50ml Medical-Grade Vial.
This is your transport vehicle. It’s not a random bottle. It’s medical-grade, which means it’s sterile and won’t contaminate your sample. More importantly, it looks the part. When you hand this over, it needs to pass the eye test from the collector. A shady, flimsy bottle raises flags. This one doesn’t.
The Temperature Strip.
This is your nervous system. It’s pre-attached to the vial for one reason: to tell you the liquid’s internal temp, not the air temp. It only reads between 85-100°F. No number? You’re out of range. The sweet spot is 96-98°F—exactly like fresh pee. This strip is your single best defense against the #1 failure point: wrong temperature.
Two Air-Activated Heaters.
These are your engines. You stick one to the back of the vial, opposite the strip. Why opposite? So the heater’s warmth doesn’t give the strip a false, high reading. These heaters are your lifeline for maintaining temp during a long, boring wait in a lobby.
The Instructions.
Don’t be a hero. Read them.
Now, here’s the critical bit.
Some people try to save a few bucks and just buy the powdered urine vial alone. Bad move. You’ll be scrambling for a container, a thermometer, and a heat source. The kit exists because all these parts work together. The medical-grade vial holds the right volume. The temperature strip gives you a precise, instant read. The heaters provide controlled, lasting warmth.
A ton of test clear urine reviews mention one thing: “Kit arrived with everything I needed.” That’s the point. It’s a complete solution.
But knowing the parts is just step one.
You can have all the best tools in the world and still screw up the build order. The sequence matters. A lot. And that’s where most people trip up next.
- Made from real dehydrated human urine.
- It will pass specimen validity tests.
- Labs cannot tell that it’s synthetic.
- Trusted by professionals and researchers
The Correct Preparation: A Step-by-Step Guide to Using Test Clear Urine
The most common point of failure isn’t the product. It’s the prep.
You can have the best kit in the world and still screw it up with a sloppy build. So let’s walk through the exact, step-by-step process. Follow this, and you avoid the simple, dumb mistakes that trip everyone else up.
Step 1: The Mix.
Open the small vial of powdered urine. Pour every last grain into the larger 50ml tube.
Now, grab a bottle of water. Use bottled water, not tap. Tap water has minerals and chlorine that can mess with the sample’s chemistry. Fill the tube with room-temperature bottled water right to the very top.
Step 2: The Shake.
Screw that blue cap on tight. Now, shake it gently. You’re not making a cocktail. You’re just dissolving the powder. Keep going until the liquid is clear with no clumps or gritty residue at the bottom. This part is simple. Don’t overthink it.
Step 3: The First Heat.
Here’s your first critical move. Pop the capped tube in the microwave for exactly 10 seconds. Not 9. Not 12. Ten. This gives you your initial heat base.
Step 4: The Read.
Immediately after microwaving, check the temperature strip on the front of the tube. You’re looking for a reading between 96-98°F. That’s the sweet spot. If it’s below 90°F, you need more heat. If it’s over 100°F, it’s too hot—more on that in a second.
Step 5: The Sustained Heat.
Peel the backing off one of the air-activated heaters. Stick it firmly to the back of the tube, directly opposite the temperature strip. Use a rubber band or some tape to make sure it’s snug. This heater is your lifeline. It maintains that perfect temp for hours.
A quick note on overheating: If you nuke it too long and the strip reads over 100°F, don’t panic. Just take the cap off and gently blow across the opening. It’ll cool down into the green zone in under a minute.
Step 6: The Hide.
This is where the anxiety hits. “Where do I put this thing?” The answer is simple: against your skin.
Your body is a perfect, natural heater. Tuck the tube into a pair of tight compression shorts or snug underwear. It stays warm, it’s secure, and it’s not making any suspicious noises in your pocket. This directly solves the “pat-down” fear. They can’t take your shorts off you.
You’ve now built the sample correctly. But all this work is for nothing if the temperature is off when you hand over the cup.
And that one variable—temperature—is the single biggest reason people fail. It’s so critical it deserves its own deep dive. Next up, we’ll break down exactly how to manage it.
Managing Temperature: The Critical Factor for Passing Your Test
Let’s talk about the one thing that can instantly sink you.
Forget the lab’s fancy machines for a second. The very first check is dead simple.
Is the sample between 90 and 100°F?
If it’s not, you’re done. Game over. They’ll mark it as “invalid” before they even run a single chemical test. All that prep work, all that stress, wasted because of a few degrees.
Why? Because fresh pee comes out of your body at around 98°F. It cools down predictably. A sample that’s too cold screams “I was stored in a fridge.” A sample that’s too hot screams “I microwaved this in the parking lot.” Either way, it’s a giant red flag for substitution.
So, your entire mission boils down to one thing: nailing that temperature window.
Here’s the gangster method. The two-stage approach that gives you the most control.
Stage 1: The Initial Heat-Up.
The fastest way is a microwave. Uncap the bottle, nuke it for 10 seconds max. That’s it. Not 15, not 12. Ten. Then immediately check the temperature strip on the bottle. You’re aiming for a reading in the 94-98°F range. If it’s low, do another tiny burst of 3-5 seconds. Don’t overthink it. The strip is your best friend here.
Stage 2: The Maintenance Crew.
Once it’s in the zone, slap on the included heat pad. This isn’t to heat it up—it’s to maintain the heat. The pad is your buffer against the world. It fights off the ambient air that wants to cool your sample down.
But what if you can’t use a microwave?
No sweat. This is for the truck drivers, the random testers, anyone caught off guard.
Your only tool is the heat activator powder and your own body.
- Mix your powdered urine with room-temp water as instructed.
- Attach the heat pad immediately. This will take a solid 45-60 minutes to bring the vial up to range from cold.
- Your body is the final regulator. Tuck the vial deep against your skin—think groin area, inner thigh, bra line. Your body heat is a constant, reliable 98°F. It will keep the sample in the perfect zone for hours.
The Waiting Room Nightmare.
This is where panic sets in. You’re sitting there, sample strapped to your leg, and the minutes are ticking by. Will it cool down? Will the pad fail? Understanding the logistics of maintaining sample temperature is critical when you are facing delays.
Here’s your playbook:
- Enter Hot. Walk into the facility with your sample reading 94-98°F. This gives you a cooling buffer before you hit the cup.
- Trust Your Body. If you’re using the body-heat method, you’re actually in a great spot. Your natural warmth is the most consistent heater there is.
- The Long Wait (Over 60 mins). If you’re stuck forever, a quick bathroom break is your secret weapon. Just a 10-second check of the strip. If it’s dipping toward 92°F, you can use hand warmers (if you have them) or just reposition the vial closer to your core body heat for a quick boost.
The goal is to hand over a sample that reads 96-98°F on their cup’s strip. That’s the sweet spot. Natural. Believable.
Master this, and you’ve cleared the first—and biggest—hurdle. The acceptable temperature range for a submitted urine specimen is 90°F to 100°F. The sample looks right, feels right, and passes the most immediate sniff test.
But that leads to the next logical question… even if the temperature is perfect, will the lab’s advanced technology detect it’s not real? That’s a whole different layer of risk we need to unpack.
Advanced Tip: The Waiting Room Strategy for Perfect Temperature Control
So you’ve got the temperature locked in.
But now you’re sitting in that stale, quiet waiting room. And the minutes are dragging by.
This is where most plans fall apart. That heating pad? It’s doing its job… but it’s a slow, steady burn. It’s not built for precision adjustments when you’re 5 minutes from handing over the cup.
Here’s the veteran move. The “doubling up” method.
Think of it like a one-two punch for total control.
Your first line of defense is the heating pad. You’ve already activated it. It’s taped to the vial, giving you that baseline warmth. It’s your workhorse, keeping the sample in the general ballpark for hours.
But it’s not surgical.
That’s where your secret weapon comes in: the heat activator powder.
This isn’t something you use from the start. You hold it in reserve. It’s your tactical, emergency adjustment for the final stretch.
Here’s the play.
When your name is called—or just before you stand up—you discreetly add a tiny amount of this powder to the vial. We’re talking a small pinch. Not a dump.
It works fast. It gives you a quick, controlled heat boost right when you need it most. This is how you nail that perfect 96-98°F reading on their strip, no matter how long you were stuck in that waiting room.
But here’s the critical mistake people make.
They get nervous. They think more powder equals more heat. So they dump in a bunch.
Don’t.
If you over-apply, you risk two things. First, you can overshoot the temperature, pushing it over 100°F. That looks just as suspicious as being too cold.
Second—and this is the subtle killer—you can mess with the visual consistency. The powder needs to dissolve completely. If you use too much, the urine can take on an unnatural, slightly tinted look. Or worse, it can look grainy. Like it has tiny particles floating in it.
And that? That fails the “eye test” instantly.
So remember: Baseline warmth from the pad. A surgical, last-minute boost from a tiny bit of powder. That’s the combo that beats the waiting room every time.
Can Labs Detect Synthetic Urine? Understanding the Risks and Realities
Can Labs Detect Synthetic Urine? Understanding the Risks and Realities
So you’re staring at that bottle.
And the big, scary question pops into your head…
Can modern labs like Quest or LabCorp actually detect this stuff?
Here’s the deal.
Yes. They can.
But only if you use the wrong stuff.
Let me break down how they try to catch you.
It’s called Specimen Validity Testing (SVT).
Basically, the lab plays detective with your sample’s chemistry.
They’re not just looking for drugs.
They’re checking if it’s real, human piss.
They run a few key checks…
The Standard Lab Check.
This is the main battlefield.
Labs measure three critical things:
- Specific Gravity.
Think of this as the “density” or “thickness” of your urine.
Real human pee isn’t water.
It has salts and waste in it.
The normal range is 1.0010 to 1.0200.
Cheap synthetic urine often fails here.
It reads like water… 1.0000.
That’s an instant flag. - pH Balance.
Your pee has a natural acidity level.
The normal range is 4.5 to 8.0.
A lot of fake urines are poorly made.
Their pH drifts outside this window.
Another instant red flag. - Creatinine Levels.
This is a waste product your muscles make.
It’s a stability marker.
Labs check for it.
If it’s below 20 mg/dL, they suspect dilution or substitution.
If it’s below 2 mg/dL, it’s basically confirmed as fake.
And there’s one more sneaky test…
They look for biocides.
These are preservatives—like sodium azide—used in cheap, bottled synthetic urine to keep it shelf-stable.
Labs have a simple test for them.
If they find biocides, you’re done.
Game over.
So how does Test Clear beat these tests?
Simple.
It’s not synthetic urine.
It’s real, dehydrated human urine.
The powder contains all the natural markers.
Urea. Uric acid. Creatinine.
It’s formulated to hit the exact specific gravity and pH of a normal, clean human sample.
When you mix it with water, you’re not making a “fake.”
You’re rehydrating the real thing.
That’s why it passes the standard SVT.
It looks, smells, and chemically is human urine to the lab’s initial machines.
But there’s a limit. And I gotta be straight with you.
Test Clear is not designed to pass a DNA verification test.
Some specialized labs—think forensic, high-security, or certain compliance monitoring—can check for human DNA in the urine.
They compare it to a cheek swab.
Synthetic urine has no DNA.
Test Clear, being powdered urine, also has no living DNA cells.
So, if your test is a standard pre-employment, DOT, or probation screen at a place like LabCorp?
You’re in the clear.
They don’t run DNA.
They run SVT.
And that’s exactly what Test Clear is built to beat.
If it’s a test where they watch you pee and verify your DNA?
No product on the market can help you there.
That’s a different game.
The bottom line?
Know your test.
For the vast majority of situations, the risk isn’t some high-tech detection of synthetic urine.
It’s you messing up the temperature or preparation.
The standard lab check is what you need to beat.
And Test Clear is gangster at beating it.
Now that you know it can pass the lab’s chemistry check…
How does it stack up against other brands you’ve heard of?
Let’s get into that next.
- Made from real dehydrated human urine.
- It will pass specimen validity tests.
- Labs cannot tell that it’s synthetic.
- Trusted by professionals and researchers
Choosing a Product: How Test Clear Compares to Other Synthetic Urine Kits
So you’ve done your homework.
You’ve seen the other names floating around. Quick Fix. UPass. Maybe some others.
And now you’re wondering… is Test Clear actually better? Or just more expensive?
Fair question. Let’s break it down.
The Big Difference: Powder vs. Premixed
This is the core of it.
Most kits you see, like Quick Fix and UPass, are premixed liquids. You open the bottle, heat it, and go. No fuss. No mixing. It’s designed to be simple.
Test Clear is different. It’s a powdered urine kit. You get a vial of dehydrated human urine. You mix it with water yourself before you leave.
Think of it like this: premixed is the microwave meal. Powdered is the recipe with fresh ingredients.
So what does that actually mean for you?
Convenience vs. Control.
Premixed is faster. Less to think about. If you’re in a huge rush or get super nervous with steps, that simplicity is a real plus.
But that premixed liquid has been sitting in that bottle for months. It needs preservatives to stay stable.
Here’s the juicy bit. Some labs have gotten smarter. They sometimes test for those exact preservatives.
Test Clear’s powder form? It doesn’t need them. When you mix it fresh, you get a sample that’s chemically fresh. No preservative flags to worry about.
Temperature: Pads vs. Activator Powder
Both kits give you a heat source. But they work differently.
Quick Fix and UPass rely on a heating pad. It’s a passive, steady heat. You stick it to the bottle and hope it holds the temp in the 94-100°F range.
Test Clear gives you air-activated heaters and a separate heat activator powder. The powder is your secret weapon. A tiny sprinkle can raise the temp fast if it’s dipping low. It gives you way more control in a pinch. That’s a gangster move when you’re in a waiting room watching the temp strip.
The Price Tag: Is It Worth It?
Let’s not beat around the bush. Test Clear costs more.
You’re looking at $59.95 – $69.95.
Quick Fix is about $39.95 – $44.95.
UPass is even cheaper at $29.95.
So why pay more?
You’re paying for the freshness of the powdered formula and the control of the heat activator. You’re paying for a kit that’s designed to avoid the specific things labs have started looking for in older, premixed formulas.
The Trade-Off
The convenience of premixed is real. No mixing, less to mess up.
But that convenience comes with a shelf life and a formula that’s been the same for years. Labs catch on.
Test Clear requires that fiddly mixing step. Get the water amount wrong, and you can mess up the concentration. It’s a bit more work.
But for that work, you get a fresher, more adaptable product.
The Bottom Line
If you want the easiest, quickest option and your test is standard, a premixed kit can work.
But if you want the sample that feels most like the real thing, gives you more temperature control, and uses a fresher formula that’s harder for labs to flag, Test Clear is the stronger choice.
It’s about investing in peace of mind.
But here’s the thing—even the best product can be ruined by one simple mistake before you even leave the house. If you don’t store it right, none of this matters. Let’s talk about that next.
Proper Storage and Shelf Life: Protecting Your Synthetic Urine Kit
Proper Storage and Shelf Life: Protecting Your Synthetic Urine Kit
Picture this.
You were smart. You bought your Test Clear kit months ago for an emergency. A test just got sprung on you, and you dig it out, ready to go.
But then you wonder… is this stuff still good?
Here’s the deal. The storage rules for the powder and the mixed liquid are completely different. Mess this up, and you’re holding a useless bottle.
The Powder: Your Long-Term Stash
This is the gangster feature. The unmixed powder has a crazy long shelf life.
We’re talking years.
But only if you store it right. The powder hates moisture and heat. Keep the sealed vial in a cool, dark, and dry place. A drawer, a closet, not your car’s glove box in summer.
If the powder is still its normal tan color and not clumped hard, it’s likely still good. No printed expiration date exists. Users report success after 2-3 years of proper storage.
The Mixed Liquid: The 72-Hour Clock
Once you add water, the clock starts ticking fast.
Your prepared sample is only reliable for about 72 hours if you refrigerate it and keep it sealed. At room temperature? Use it the same day.
Do not plan to mix it days in advance and leave it on your counter. The chemistry starts to change.
The Reheating Question
So, what if you mixed it, refrigerated it, and now need to reheat it?
Use the provided air-activated heaters again. The official word is to avoid the microwave or boiling water, as intense heat can alter the sample.
And here’s the critical part: don’t reheat it more than once. Repeated heat-cool cycles can degrade the sample’s appearance and chemistry. You’re asking for trouble.
The protocol is simple.
Keep the powder sealed until the last minute. Mix it only when you know your test is within the next day or two. Store the liquid cold if you must wait.
Following this keeps your kit ready and effective. But while proper storage handles the practical risk of a degraded product, there’s a more serious category of risk you absolutely need to understand before you even think about using it.
The legal one.
How to Buy Safely: Avoiding Scams and Ensuring Product Authenticity
So you’ve done the legal homework.
You know this is an option for your specific test.
The next move is simple.
Get the real product.
But your brain is screaming… What if I get scammed?
What if I spend $90 on a bottle of colored water?
What if the seal is broken?
What if it’s expired?
I get it.
That fear is real.
And it stops people cold.
Here’s the gangster move to obliterate that worry.
Only buy from the official TestClear website.
That’s it.
Simples.
Why?
Because it’s the only way to guarantee three things.
Authenticity. You get the real urine simulation with powdered urine kit—not a knockoff.
Proper Storage. It’s been stored correctly, not baking in a hot warehouse.
A Valid Date. It won’t be expired the day it arrives.
Now, you might be hunting for a powdered urine kit on Amazon or at a local head shop.
I know it feels faster.
But here’s the juicy truth.
Amazon, Walmart, eBay… they’re flooded with fakes.
Third-party sellers push counterfeit or incomplete kits.
You might get a bottle with no powder.
Or a heater that doesn’t heat.
Or a seal that’s already been popped.
And head shops?
Less anonymity. And the stock can sit on a shelf for months.
Not ideal.
So you order from the official site.
The package arrives.
Now what?
Don’t just rip it open.
Do a quick, 30-second check.
This is how you identify authentic powdered urine kits and kill the last bit of paranoia.
Check the safety seal. It must be intact. No cracks. No tampering.
Find the expiration date. Make sure it’s in the future.
Inventory the parts. Powder, vial, heater, temperature strip. All there.
That’s your verification process.
It turns a moment of doubt into confidence.
You’ve now secured the tool.
But the biggest hurdle isn’t in the mail.
It’s in your head.
The anxiety of waiting rooms. The fear of getting caught.
That’s the final boss.
And we’ll tackle that next.
- Made from real dehydrated human urine.
- It will pass specimen validity tests.
- Labs cannot tell that it’s synthetic.
- Trusted by professionals and researchers
Managing Test-Day Anxiety: Mental Strategies for a Calm and Successful Outcome
Let’s be real.
The technical steps are only half the battle.
The other half is the mental game. That knot in your stomach. The paranoia that everyone knows. The fear that your nerves will make you fumble the vial or overheat the sample.
It’s a real problem. Because looking nervous is a massive red flag. Collection techs are trained to spot it. Fidgeting, avoiding eye contact, spending too long in the restroom—that’s what gets you flagged for a closer look or an observed collection.
So, managing your anxiety isn’t a “nice-to-have.” It’s as critical as checking the temperature strip. Here’s how to lock it down.
Strategy 1: The Dry Run
This is non-negotiable.
The day before your test, do a full practice run. At home. In private.
Mix the powder. Activate the heater. Tuck the vial into your clothing exactly where you plan to hide it. Walk around. Sit down. Stand up. Practice getting it out smoothly.
Why? You’re building muscle memory. When you’re stressed, your brain reverts to what it knows. If your hands have done the动作 a dozen times already, they’ll do it automatically on the day. This alone kills a huge chunk of anxiety.
Strategy 2: The Waiting Room Reset
The lobby wait is where anxiety spikes. The clock’s ticking. Your sample’s temperature is your lifeline.
Use box breathing. It’s simple and gangster for calming your system.
- Breathe in for 4 seconds.
- Hold for 4 seconds.
- Breathe out for 4 seconds.
- Hold for 4 seconds.
Repeat. It physically slows your heart rate and stops the spiral. While you do it, keep the vial pressed firmly against your body. This isn’t just for heat—it’s a discreet, grounding action. A focus point.
Strategy 3: The Simple Cover Story
If a tech makes small talk or seems curious, have a bland, ready answer.
- If you seem tense: “Yeah, just a long day. Thanks for being quick.”
- If asked about the wait: “All good, just want to get it done.”
The goal is to sound bored, not panicked. A calm, simple response ends the interaction. Don’t over-explain. Don’t tell a story.
These mental strategies are your invisible armor. They protect all the technical prep you’ve done. You’ve verified your kit is legit. Now, you’re verifying your own composure.
Because all the perfect prep in the world means nothing if your nerves sell you out.
Next up, we’ll look at the cold, hard data. What do real-world results actually say about success rates when you follow the plan?
Evaluating Efficacy: Does Test Clear Synthetic Urine Work in Real-World Use?
So… does this stuff actually work?
That’s the million-dollar question, right?
You can read all the theory in the world. But when your job or your freedom is on the line, you need proof.
Let’s look at the cold, hard data from the trenches.
The Success Stories Are Loud.
The reviews aren’t just positive. They’re full of people in your exact shoes, sweating the same stress, who passed.
Test Clear holds a 4.7 out of 5-star rating. 93% of users give it 4 or 5 stars. That’s not a fluke.
What are they saying?
- “I’ve been using their urine simulation product for years and it has never failed me.”
- “5 Star as always. Been using this product for years upon years now, and it has never let me down!”
- Reports of lab techs tagging and bagging samples without a second glance.
The common thread in these wins? They followed the plan. They mixed it right. They nailed the temperature. They treated it with the seriousness the situation demands.
But Let’s Talk About the Failures.
Because ignoring them would be a lie. And we don’t do that here.
The negative reviews cluster around a few specific, avoidable mistakes.
- Temperature is King. The #1 cause of failure is handing over a sample that’s too hot or, more often, too cold. It has to be between 90-100°F. No exceptions.
- User Error is Real. Reports of overheating the sample, adding too much water (which tanks your creatinine levels and screams “diluted”), or not mixing it fully so it clumps up.
- The Powdered Gamble. Here’s the trade-off with powdered urine versus pre-mixed. It’s gangster for shelf life. It can last for years in your closet. But it’s also more fiddly. You have to mix it perfectly. Any mistake in that step—wrong water temp, not shaking enough—can throw off the pH or specific gravity.
- The Advanced Lab Problem. Some high-tech labs (like for DOT or federal jobs) can run deeper tests. They might check for things like oxidants or weird ion ratios. Test Clear is formulated to pass standard validity checks, but a super-advanced GC/MS confirmation test can sometimes spot chemical inconsistencies. This is a risk you have to weigh.
So, What’s the Verdict?
It’s not magic.
It’s a tool. A very credible one.
Think of it like a high-performance engine. In the hands of someone who knows what they’re doing, it wins races. In the hands of someone who skips the manual, it blows up.
The data shows a clear pattern: Test Clear works when you work the system. The failures aren’t random. They’re tied directly to specific, documented screw-ups in prep, temperature, or choosing the wrong test environment.
Your job is to not be that person. To use the checklist. To do the practice run.
Because the evidence is there. People just like you, with a lot on the line, are using this kit and getting that “negative” result they need.
The question isn’t just “does it work?”
It’s “will I make it work?”
The next sections are all about making sure your answer is a solid yes.
Final Preparation Checklist: A Calm and Confident Approach to Your Test
Your Final Checklist: No Luck, Just a Plan
Look. Passing this isn’t about magic or luck. It’s about discipline. It’s about following a proven system so you don’t become a failure statistic.
You’ve got the knowledge. Now, use it as your operational manual. Before you walk out the door, run down this list. Did you avoid the critical mistakes?
- Know Your Kit: Did you open it, check every piece, and understand what each part does? Don’t be surprised on game day.
- Nail the Mix: Did you follow the instructions exactly? No extra water. No guessing. The chemistry has to be right.
- Master the Temp: This is the big one. Do you have a two-stage plan to hit and hold that 90-100°F sweet spot? Practice with a thermometer.
- Know the Law: Are you 100% sure your test is unsupervised? Using this for a DOT, probation, or military test is playing with fire. Don’t.
- Buy Smart: Did you get your kit from a trusted source to avoid scams and expired product? Don’t cheap out here.
- Control Your Nerves: Have a plan for the waiting room. Have a plan for discreet transfer. Panic causes sloppy mistakes.
- Trust the Tool: Test Clear is a gangster tool when used right. It has the right components. It has a 4.7-star rating for a reason. Your job is to be the disciplined operator.
So here’s your call to action. Use this guide. Print it out. Do a full practice run at home. Walk into that clinic not with hope, but with a plan. You’ve got the blueprint for a calm, controlled, and successful test.
Now go execute.